[Practices] Accessing Keycloak Endpoints Using Postman
1. Introduction
In this article, we start with a quick review of OAuth 2.0, OpenID, and Keycloak. Afterward, we'll learn about the Keycloak REST APIs and how to call them in Postman.
2. OAuth 2.0
OAuth 2.0 is an authorization framework that lets an authenticated user grant access to third parties via tokens. A token is usually limited to some scopes with a limited lifetime. Therefore, it's a safe alternative to the user's credentials.
OAuth 2.0 comes with four main components:
- Resource Owner – the end-user or a system that owns a protected resource or data
- Resource Server – the service exposes a protected resource usually through an HTTP-based API
- Client – calls the protected resource on behalf of the resource owner
- Authorization Server – issues an OAuth 2.0 token and delivers it to the client after authenticating the resource owner
OAuth 2.0 is a protocol with some standard flows, but we're especially interested in the authorization server component here.
3. OpenID C0nnect
OpenID Connect 1.0 (OIDC) is built on top of OAuth 2.0 to add an identity management layer to the protocol. Hence, it allows clients to verify the end user's identity and access basic profile information via a standard OAuth 2.0 flow. OIDC has introduced a few standard scopes to OAuth 2.0, like openid, profile, and email.
4. Keycloak as Authorization Server
JBoss has developed Keycloak as a Java-based open-source Identity and Access Management solution. Besides the support of both OAuth 2.0 and OIDC, it also offers features like identity brokering, user federation, and SSO.
We can use Keycloak as a standalone server with an admin console or embed it in a Spring application. Once we have our Keycloak running in either of these ways, we can try the endpoints.
5. Keycloak Endpoints
Keycloak exposes a variety of REST endpoints for OAuth 2.0 flows.
To use these endpoints with Postman, let's start with creating an Environment called “Keycloak“. Then we add some key/value entries for the Keycloak authorization server URL, the realm, OAuth 2.0 client id, and client password:

Then, let's create a collection where we can organize our Keycloak tests. Now, we're ready to explore available endpoints.
5.1. OpenID Configuration Endpoint
The configuration endpoint is like the root directory. It returns all other available endpoints, supported scopes and claims, and signing algorithms.
Let's create a request in Postman: {{server}}/auth/realms/{{realm}}/.well-known/openid-configuration. Postman sets values of {{server}} and {{realm}} from the selected environment during runtime:

Then we execute the request, and if everything goes well, we have a response:
{
    "issuer": "http://localhost:8083/auth/realms/baeldung",
    "authorization_endpoint": "http://localhost:8083/auth/realms/baeldung/protocol/openid-connect/auth",
    "token_endpoint": "http://localhost:8083/auth/realms/baeldung/protocol/openid-connect/token",
    "token_introspection_endpoint": "http://localhost:8083/auth/realms/baeldung/protocol/openid-connect/token/introspect",
    "userinfo_endpoint": "http://localhost:8083/auth/realms/baeldung/protocol/openid-connect/userinfo",
    "end_session_endpoint": "http://localhost:8083/auth/realms/baeldung/protocol/openid-connect/logout",
    "jwks_uri": "http://localhost:8083/auth/realms/baeldung/protocol/openid-connect/certs",
    "check_session_iframe": "http://localhost:8083/auth/realms/baeldung/protocol/openid-connect/login-status-iframe.html",
    "grant_types_supported": [...],
    ...
    "registration_endpoint": "http://localhost:8083/auth/realms/baeldung/clients-registrations/openid-connect",
    ...
    "introspection_endpoint": "http://localhost:8083/auth/realms/baeldung/protocol/openid-connect/token/introspect"
}
As mentioned before, we can see all available endpoints in the response — for example, “authorization_endpoint“, “token_endpoint“, and so on.
Moreover, there are other useful attributes in the response. For example, we can figure out all supported grant types from “grant_types_supported” or all supported scopes from “scopes_supported“.
5.2. Authorize Endpoint
Let's continue our journey with the authorize endpoint responsible for OAuth 2.0 Authorization Code Flow. It's available as “authorization_endpoint” in the OpenID configuration response.
The endpoint is:
{{server}}/auth/realms/{{realm}}/protocol/openid-connect/auth?response_type=code&client_id=jwtClient
Moreover, this endpoint accepts scope and redirect_uri as optional parameters.
We're not going to use this endpoint in Postman. Instead, we usually initiate the authorization code flow via a browser. Then Keycloak redirects the user to a login page if no active login cookie is available. Finally, the authorization code is delivered to the redirect URL.
Let's go to the next step to see how we can obtain an access token.
5.3. Token Endpoint
The token endpoint allows us to retrieve an access token, refresh token, or id token. OAuth 2.0 supports different grant types, like authorization_code, refresh_token, or password.
The token endpoint is: {{server}}/auth/realms/{{realm}}/protocol/openid-connect/token
However, each grant type needs some dedicated form parameters.
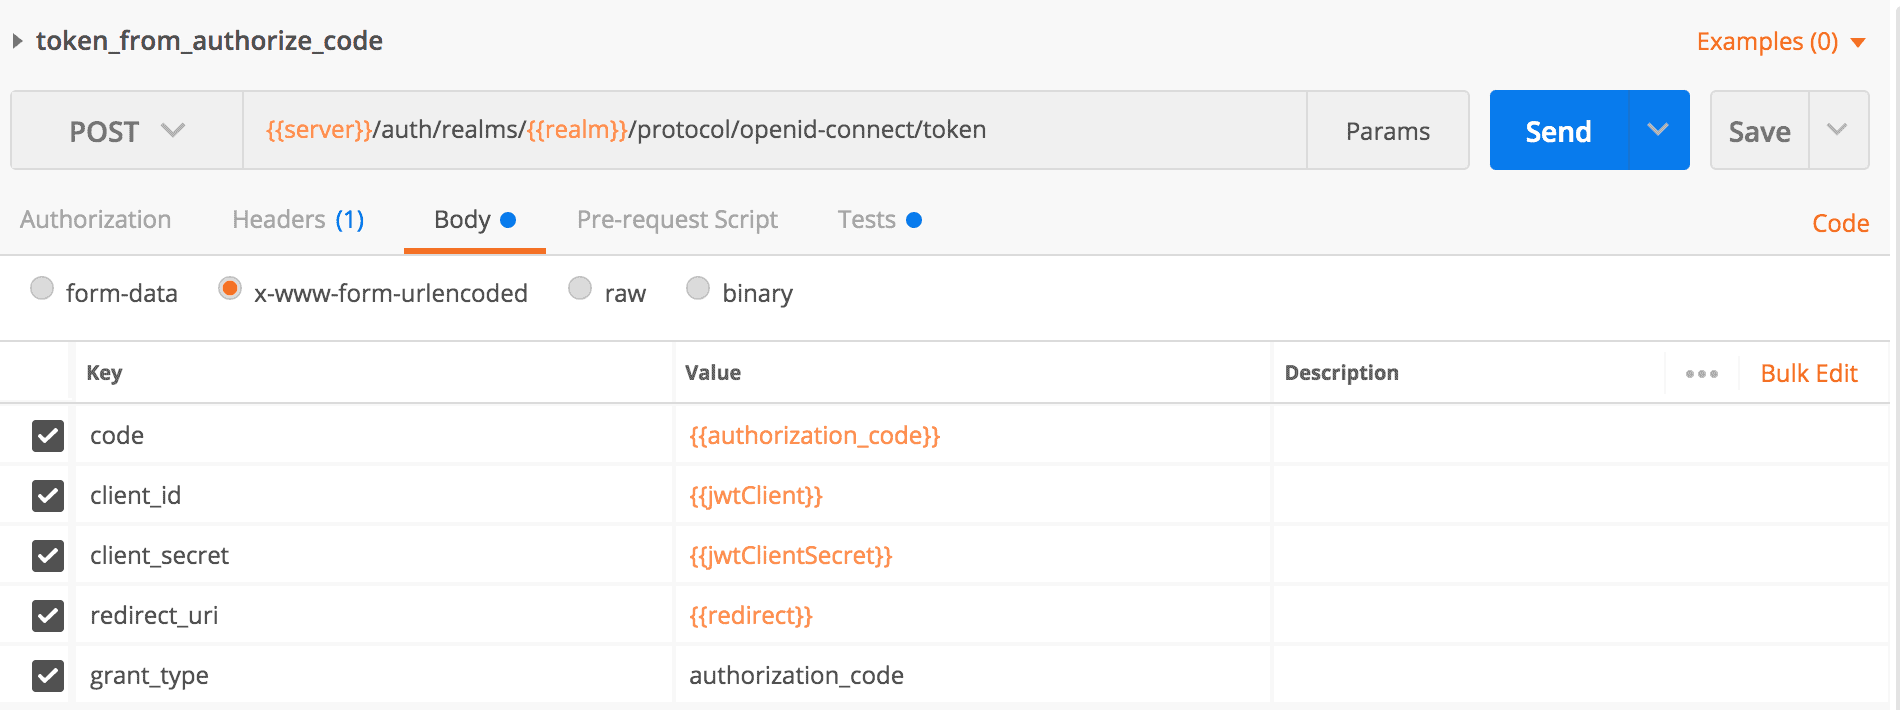
Let's first test our token endpoint to obtain an access token for our authorize code. We have to pass these form parameters in the request body: client_id, client_secret, grant_type, code, and redirect_uri. The token endpoint also accepts scope as an optional parameter:
Moreover, if we want to bypass the authorization code flow, the password grant type is the choice. Here we need user credentials, so we can use this flow when we have a built-in login page on our website or application.
Let's create a Postman request and pass the form parameters client_id, client_secret, grant_type, username, and password in the body:
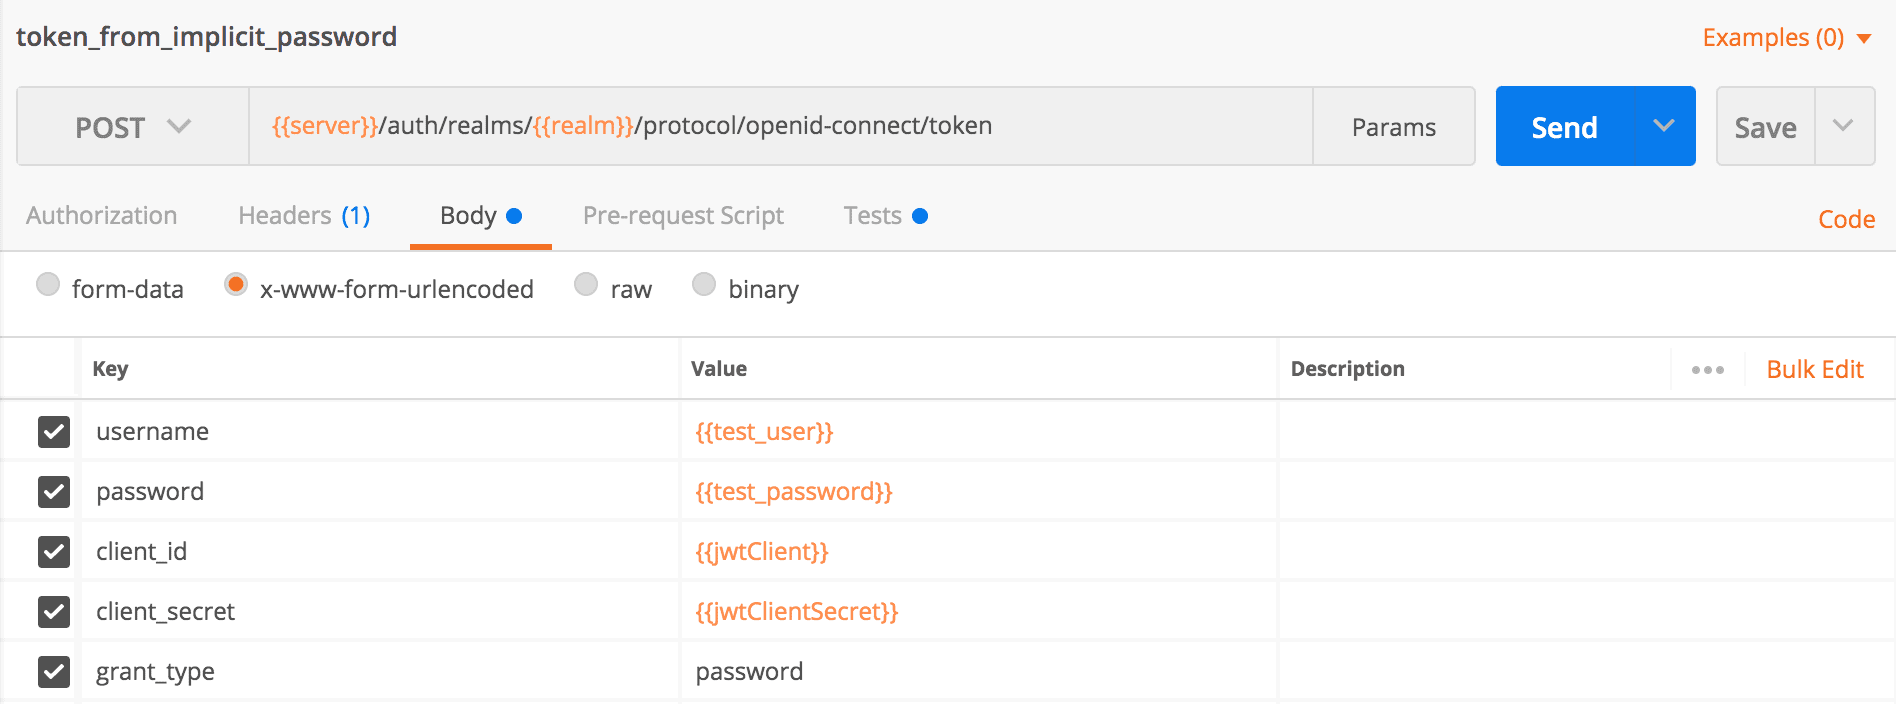
Before executing this request, we have to add the username and password variables to Postman's environment key/value pairs.
Another useful grant type is refresh_token. We can use this when we have a valid refresh token from a previous call to the token endpoint. The refresh token flow requires the parameters client_id, client_secret, grant_type, and refresh_token.
We need the response access_token to test other endpoints. To speed up our testing with Postman, we can write a script in the Tests section of our token endpoint requests:
var jsonData = JSON.parse(responseBody);
postman.setEnvironmentVariable("refresh_token", jsonData.refresh_token);
postman.setEnvironmentVariable("access_token", jsonData.access_token);
5.4. User Information Endpoint
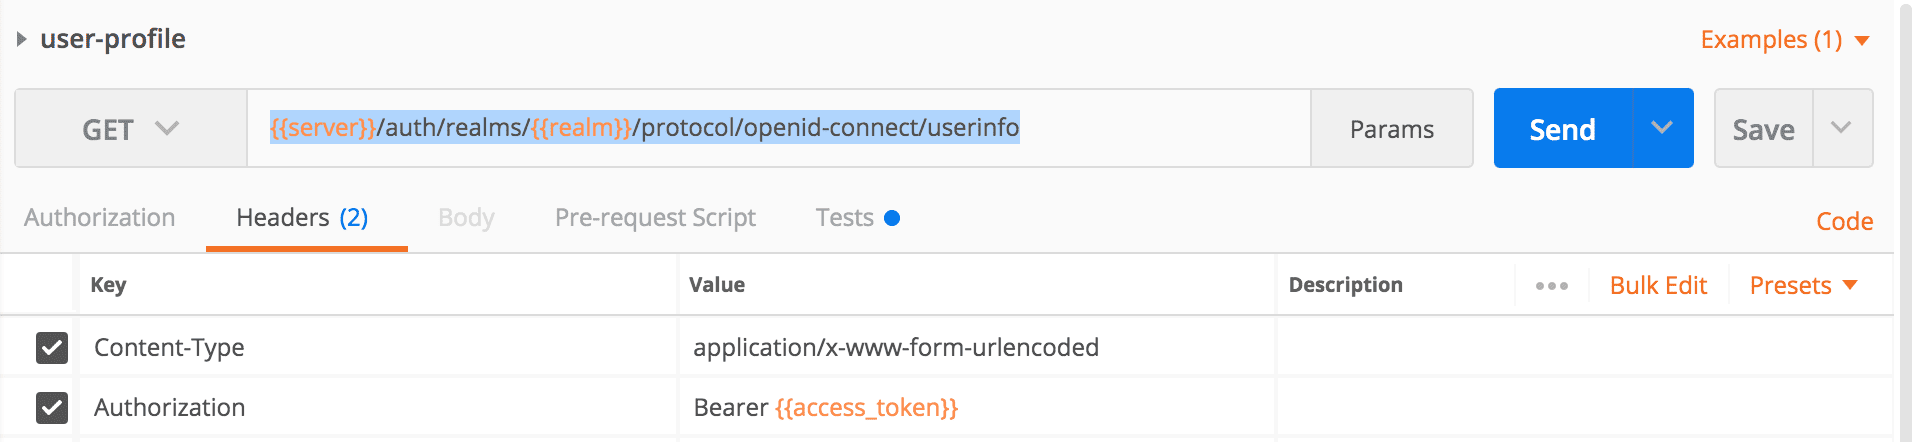
We can retrieve user profile data from the user information endpoint when we have a valid access token.
The user information endpoint is available at: {{server}}/auth/realms/{{realm}}/protocol/openid-connect/userinfo
Let's create a Postman request for it and pass the access token in the Authorization header:
Then we execute the request. Here is the successful response:
{
    "sub": "a5461470-33eb-4b2d-82d4-b0484e96ad7f",
    "preferred_username": "john@test.com",
    "DOB": "1984-07-01",
    "organization": "baeldung"
}
5.5. Token Introspect Endpoint
If a resource server needs to verify that an access token is active or wants more metadata about it, especially for opaque access tokens, then the token introspect endpoint is the answer. In this case, the resource server integrates the introspect process with the security configuration.
We call Keycloak's introspect endpoint: {{server}}/auth/realms/{{realm}}/protocol/openid-connect/token/introspect
Let's create an introspect request in Postman and then pass client_id, client_secret, and token as form parameters:

If the access_token is valid, then we have our response:
{
    "exp": 1601824811,
    "iat": 1601824511,
    "jti": "d5a4831d-7236-4686-a17b-784cd8b5805d",
    "iss": "http://localhost:8083/auth/realms/baeldung",
    "sub": "a5461470-33eb-4b2d-82d4-b0484e96ad7f",
    "typ": "Bearer",
    "azp": "jwtClient",
    "session_state": "96030af2-1e48-4243-ba0b-dd4980c6e8fd",
    "preferred_username": "john@test.com",
    "email_verified": false,
    "acr": "1",
    "scope": "profile email read",
    "DOB": "1984-07-01",
    "organization": "baeldung",
    "client_id": "jwtClient",
    "username": "john@test.com",
    "active": true
}
However, if we use an invalid access token, then the response is:
{
    "active": false
}
6. Conclusion
In this article, with a running Keycloak Server, we created Postman requests for the authorization, token, user information, and introspect endpoints.
The complete examples of Postman requests are available as always over on GitHub.


No comments:
Post a Comment