Sunday, May 29, 2022


Internationalization of RESTful Services

In this section, we will discuss the Internationalization of the RESTful Web Services.

Internationalization

Internationalization is the process of designing web applications or services in such a way that it can provide support for various countries, various languages automatically without making the changes in the application. It is also known as I18N because the word internationalization has total 18 characters starting from I to N.

Localization is performed by adding locale-specific components such as translated text, data describing locale-specific behavior, etc. It supports full integration into the classes and packages that provide language-or-culture-dependent functionality.

Java provides the foundation for internationalization for desktop and server applications. There are following important internationalized areas of functionality.

36.9M
662
Prime Ministers of India | List of Prime Minister of India (1947-2020)

  • Text Representation: Java is based on the Unicode character set, and several libraries implement the Unicode standard.
  • Locale identification and localization: Locale in Java are identifiers that can be used to request locale-specific behavior in different areas of functionality. Localization is supported by ResourceBundle class. The class provides access to local specific objects, including strings.
  • Date and time handling: Java provides various calendars. It supports conversion to and from calendar independent Date objects. Java supports all the time zones in the world.
  • Text processing: It includes character analysis, case mapping, string comparison, breaking text into words, formatting numbers, dates, and time values into strings or parsing them back from strings. Most of these functions are locale-dependent.
  • Character encoding: It supports converting text between Unicode and other character encodings when reading incoming text from the streams or writing outgoing text to the streams.

We need to configure two things to make the service internationalized.

  • LocaleResolver
  • ResourceBundleMessageSource

Default Locale is Locale.US. If somebody does not specify the location, it returns the default locale. We also need to customize the ResourceBundle. It has a list of properties that are to be internationalized. We will store the properties in ResourceBundle. ResourceBundleMessageSource is a Spring MVC concept for handling properties. After that, we will use MessageSource, and a header called Accept-Language.

Let's configure the internationalization.

Step 1: Open RestfulWebServicesApplication.java file.

Step 2: Configure a Bean for default locale.

  1. @Bean  
  2. public  LocaleResolver localeResolver()  
  3. {  
  4. SessionLocaleResolver localeResolver = new SessionLocaleResolver();  
  5. localeResolver.setDefaultLocale(Locale.US);  
  6. return localeResolver;  
  7. }  

Note: Import import org.springframework.web.servlet.LocaleResolver package while importing LocaleResolver.

Step 3: Now, we will store properties in a specific file called messages.properties.

Right-click on src/main/resources folder -> New -> File -> Provide the file name: messages.properties. It contains the default locale message.

messages.properties

  1. good.morning.message=Good Morning  

Step 4: Create another property file with the name messages_fr.properties for French locale. It contains a message for the French locale.

messages_fr.properties

  1. good.morning.message=Bonjour  

Step 5: Read properties and customize them based on the input accept header. Open the RestfulWebServicesApplication.java and configure another Bean for ResourceBundle.

  1. //configuring ResourceBundle  
  2. @Bean  
  3. public ResourceBundleMessageSource bundleMessageSource()  
  4. {  
  5. ResourceBundleMessageSource messageSource = new ResourceBundleMessageSource();  
  6. messageSource.setBasename("messages");  
  7. return messageSource;  
  8. }  

RestfulWebServicesApplication.java

  1. package com.javatpoint.server.main;  
  2. import java.util.Locale;  
  3. import org.springframework.boot.SpringApplication;  
  4. import org.springframework.boot.autoconfigure.SpringBootApplication;  
  5. import org.springframework.context.annotation.Bean;  
  6. import org.springframework.context.support.ResourceBundleMessageSource;  
  7. import org.springframework.web.servlet.LocaleResolver;  
  8. import org.springframework.web.servlet.i18n.SessionLocaleResolver;  
  9. @SpringBootApplication  
  10. public class RestfulWebServicesApplication   
  11. {  
  12. public static void main(String[] args)   
  13. {  
  14. SpringApplication.run(RestfulWebServicesApplication.class, args);  
  15. }  
  16. //configuring default locale  
  17. @Bean  
  18. public  LocaleResolver localeResolver()  
  19. {  
  20. SessionLocaleResolver localeResolver = new SessionLocaleResolver();  
  21. localeResolver.setDefaultLocale(Locale.US);  
  22. return localeResolver;  
  23. }  
  24. //configuring ResourceBundle  
  25. @Bean  
  26. public ResourceBundleMessageSource messageSource()  
  27. {  
  28. ResourceBundleMessageSource messageSource = new ResourceBundleMessageSource();  
  29. messageSource.setBasename("messages");  
  30. return messageSource;  
  31. }  
  32. }  

Step 6: Update the service to use these sources. Open the HelloWorldController.java and autowired the MessageSource.

  1. @Autowired   
  2. private MessageSource messageSource;  

HelloWorldController.java

  1. package com.javatpoint.server.main.helloworld;  
  2. import org.springframework.web.bind.annotation.GetMapping;  
  3. import org.springframework.web.bind.annotation.PathVariable;  
  4. import org.springframework.web.bind.annotation.RequestHeader;  
  5. import org.springframework.web.bind.annotation.RestController;  
  6. import java.util.Locale;  
  7. import org.springframework.beans.factory.annotation.Autowired;  
  8. import org.springframework.context.MessageSource;  
  9. import org.springframework.context.annotation.Configuration;  
  10. @Configuration  
  11. //Controller  
  12. @RestController  
  13. public class HelloWorldController   
  14. {  
  15. @Autowired   
  16. private MessageSource messageSource;  
  17. //using get method and hello-world URI  
  18. @GetMapping(path="/hello-world")  
  19. public String helloWorld()  
  20. {  
  21. return "Hello World";  
  22. }  
  23. @GetMapping(path="/hello-world-bean")  
  24. //method- which returns "Hello World"  
  25. public HelloWorldBean helloWorldBean()  
  26. {  
  27. return new HelloWorldBean("Hello World");//constructor of HelloWorldBean  
  28. }  
  29. //passing a path variable   
  30. //hello-world/path-variable/javatpoint  
  31. @GetMapping(path="/hello-world/path-variable/{name}")  
  32. public HelloWorldBean helloWorldPathVariable(@PathVariable String name)  
  33. {  
  34. return new HelloWorldBean(String.format("Hello World, %s",name));   //%s replace the name  
  35. }  
  36. //internationalization  
  37. @GetMapping(path="/hello-world-internationalized")  
  38. public String helloWorldInternationalized(@RequestHeader(name="Accept-Language", required=false) Locale locale)  
  39. {  
  40. return messageSource.getMessage("good.morning.message"null, locale);  
  41. }  
  42. }  

Step 7: Open the REST client Postman and perform the following changes:

  • Select the GET request.
  • Type the URI http://localhost:8080/hello-world-internationalized
  • Click on Headers tab and type:
Internationalization of RESTful Services
  • Click on the Send button.
Internationalization of RESTful Services

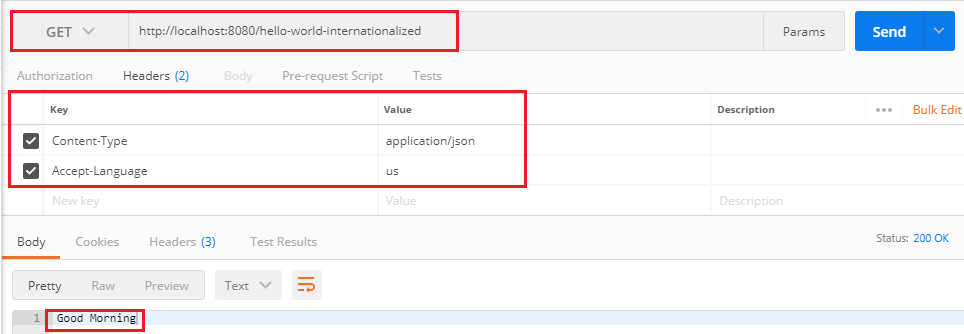
It returns the US locale message Good Morning.

Now we change the RequestHeader us to fr and send a GET request again.

Internationalization of RESTful Services

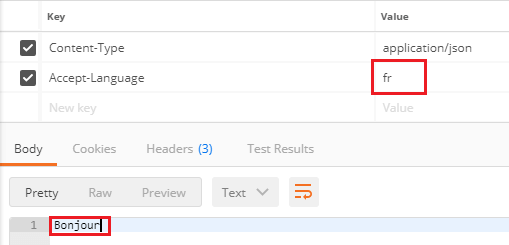
It returns the French locale message Bonjour.

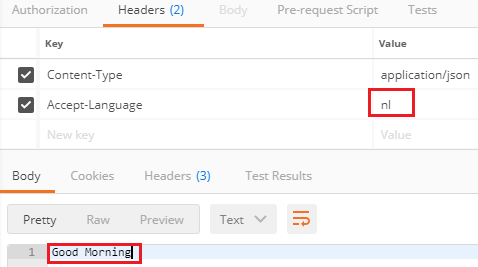
Again, change the RequestHeader fr to other RequestHeader, say nl. It returns the default locale (US) message Good Morning.

Internationalization of RESTful Services

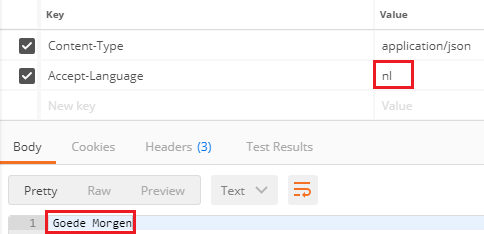
Let's create a property file message_nl.properties for RequestHeader nl. It contains a message Goede Morgen in the Dutch language.

messages_nl.properties

  1. good.morning.message=Goede Morgen  

Again send a GET request that returns the message, Goede Morgen.

Internationalization of RESTful Services

Simplify the Internationalization

Now we will simplify the implementation of internationalization, which we have done above. In the previous implementation, we have accepted locale (a RequestHeader) as a parameter to the REST controller method. If we add this to every method that has to be internationalized, it will increase the cost. Spring provides an alternative way to get it from the LocaleContextHolder.

Let's implement the LocaleContextHolder instead of RequestHeader.

Step 1: Open the HelloWorldController.java and change the return type of the helloWorldInternationalized() method.

  1. return messageSource.getMessage("good.morning.message"null, LocaleContextHolder.getLocale());  

HelloWorldController.java

  1. package com.javatpoint.server.main.helloworld;  
  2. import org.springframework.web.bind.annotation.GetMapping;  
  3. import org.springframework.web.bind.annotation.PathVariable;  
  4. import org.springframework.web.bind.annotation.RequestHeader;  
  5. import org.springframework.web.bind.annotation.RestController;  
  6. import java.util.Locale;  
  7. import org.springframework.beans.factory.annotation.Autowired;  
  8. import org.springframework.context.MessageSource;  
  9. import org.springframework.context.annotation.Configuration;  
  10. import org.springframework.context.i18n.LocaleContextHolder;  
  11. @Configuration  
  12. //Controller  
  13. @RestController  
  14. public class HelloWorldController   
  15. {  
  16. @Autowired   
  17. private MessageSource messageSource;  
  18. //using get method and hello-world URI  
  19. @GetMapping(path="/hello-world")  
  20. public String helloWorld()  
  21. {  
  22. return "Hello World";  
  23. }  
  24. @GetMapping(path="/hello-world-bean")  
  25. //method- which returns "Hello World"  
  26. public HelloWorldBean helloWorldBean()  
  27. {  
  28. return new HelloWorldBean("Hello World");//constructor of HelloWorldBean  
  29. }  
  30. //passing a path variable   
  31. //hello-world/path-variable/javatpoint  
  32. @GetMapping(path="/hello-world/path-variable/{name}")  
  33. public HelloWorldBean helloWorldPathVariable(@PathVariable String name)  
  34. {  
  35. return new HelloWorldBean(String.format("Hello World, %s",name));   //%s replace the name  
  36. }  
  37. //internationalization  
  38. @GetMapping(path="/hello-world-internationalized")  
  39. public String helloWorldInternationalized(@RequestHeader(name="Accept-Language", required=false) Locale locale)  
  40. {  
  41. return messageSource.getMessage("good.morning.message"null, LocaleContextHolder.getLocale());  
  42. }  
  43. }  

Step 2: Open RestfulWebServicesApplication.java and change SessionLocaleResolver to AcceptHeaderLocaleResolver. LocaleResolver implementation uses the primary locale specified in the "accept-language" header of the HTTP request (locale send by the client browser).

RestfulWebServicesApplication.java

  1. package com.javatpoint.server.main;  
  2. import java.util.Locale;  
  3. import org.springframework.boot.SpringApplication;  
  4. import org.springframework.boot.autoconfigure.SpringBootApplication;  
  5. import org.springframework.context.annotation.Bean;  
  6. import org.springframework.context.support.ResourceBundleMessageSource;  
  7. import org.springframework.web.servlet.LocaleResolver;  
  8. import org.springframework.web.servlet.i18n.AcceptHeaderLocaleResolver;  
  9. import org.springframework.web.servlet.i18n.SessionLocaleResolver;  
  10. @SpringBootApplication  
  11. public class RestfulWebServicesApplication   
  12. {  
  13. public static void main(String[] args)   
  14. {  
  15. SpringApplication.run(RestfulWebServicesApplication.class, args);  
  16. }  
  17. //configuring default locale  
  18. @Bean  
  19. public  LocaleResolver localeResolver()  
  20. {  
  21. AcceptHeaderLocaleResolver localeResolver = new AcceptHeaderLocaleResolver();  
  22. localeResolver.setDefaultLocale(Locale.US);  
  23. return localeResolver;  
  24. }  
  25. //configuring ResourceBundle  
  26. @Bean  
  27. public ResourceBundleMessageSource messageSource()  
  28. {  
  29. ResourceBundleMessageSource messageSource = new ResourceBundleMessageSource();  
  30. messageSource.setBasename("messages");  
  31. return messageSource;  
  32. }  
  33. }  

The advantage of AcceptHeaderLocaleResolver is that we do not require to configure request header as a parameter in every controller method.

Step 3: Open the REST client Postman and send a GET request by setting the key as Accept-Language and value as fr. It returns the message Bonjour.

Now uncheck the RequestHeader, change the value fr to en. It returns the default locale (US) message Good Morning.

Step 4: Move to RestfulWebServicesApplication.java. Remove the ResourceBundleMessageSource() method and configure it in the application.properties file.

Step 5: Open application.properties file and configure the message basename instead of creating a separate bean in RestfulWebServicesApplication.java.

application.properties

  1. logging.level.org.springframework=info  
  2. spring.messages.basename=messages  

Step 6: Repeat step 3.


No comments:

Post a Comment

So sánh các GitFlow model và áp dụng với CICD

https://medium.com/oho-software/so-s%C3%A1nh-c%C3%A1c-gitflow-model-v%C3%A0-%C3%A1p-d%E1%BB%A5ng-v%E1%BB%9Bi-cicd-b6581cfc893a